How to Read a Api With Ruby on Rails
React + Carmine on Rails = 🔥
React has taken the frontend development earth by tempest. Information technology's an fantabulous JavaScript library for building user interfaces. And it's dandy in combination with Ruby on Track. Y'all can use Runway on the back end with React on the front end in various ways.
In this hands-on tutorial, nosotros're going to build a React app that works with a Rails five.1 API.
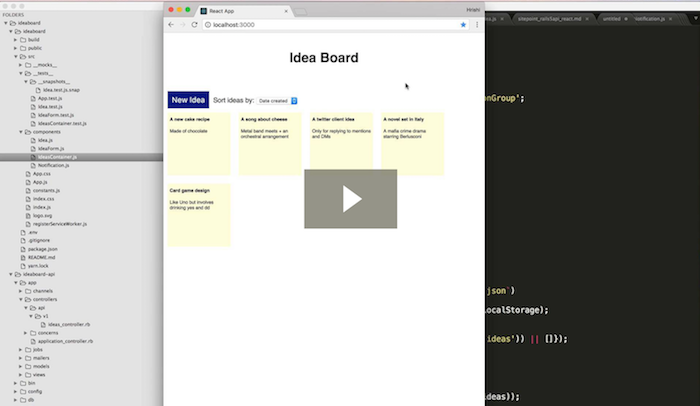
You can watch a video version of this tutorial hither.
To follow this tutorial, yous demand to exist comfortable with Rails and know the basics of React.
If you don't use Rails, you lot can also build the API in the language or framework of your pick, and just use this tutorial for the React office.
The tutorial covers stateless functional components, class-based components, using Create React App, use of axios for making API calls, immutability-helper and more.
What We're Going to Build
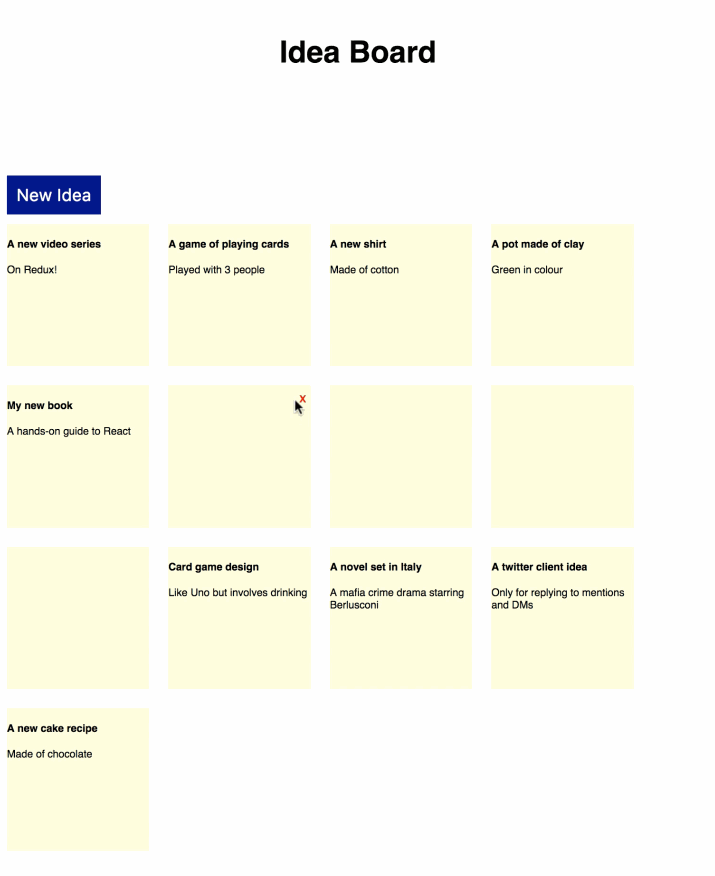
We're going to build an idea board every bit a single page app (SPA), which displays ideas in the class of foursquare tiles.
You can add new ideas, edit them and delete them. Ideas get auto-saved when the user focuses out of the editing form.
At the stop of this tutorial, we'll have a functional CRUD app, to which we can add together some enhancements, such every bit animations, sorting and search in a future tutorial.
Y'all tin can see the total code for the app on GitHub:
Ideaboard Rails API
Ideaboard React frontend
Setting up the Rails API
Allow's go started past edifice the Runway API. We'll utilize the in-built feature of Rails for building API-only apps.
Make sure you lot take version 5.ane or higher of the Rails gem installed.
jewel install rails -v 5.i.3 At the fourth dimension of writing this tutorial, 5.i.3 is the latest stable release, so that's what nosotros'll use.
And then generate a new Runway API app with the --api flag.
rails new --api ideaboard-api cd ideaboard-api Next, let'due south create the data model. We only need 1 information model for ideas with ii fields — a title and a body, both of type string.
Let'south generate and run the migration:
runway generate model Idea title:string body:string rails db:migrate At present that we've created an ideas table in our database, let'south seed it with some records and then that we have some ideas to brandish.
In the db/seeds.rb file, add the following lawmaking:
ideas = Thought .create( [ { title: "A new block recipe" , trunk: "Made of chocolate" } , { title: "A twitter client thought" , body: "Only for replying to mentions and DMs" } , { title: "A novel set up in Italy" , trunk: "A mafia crime drama starring Berlusconi" } , { championship: "Bill of fare game design" , body: "Like Uno but involves drinking" } ] ) Experience free to add your own ideas.
Then run:
rails db:seed Side by side, permit's create an IdeasController with an index action in app/controllers/api/v1/ideas_controller.rb:
module Api : : V1 class IdeasController < ApplicationController def alphabetize @ideas = Thought .all render json: @ideas terminate end stop Note that the controller is under app/controllers/api/v1 considering we're versioning our API. This is a good practice to avoid breaking changes and provide some backwards compatibility with our API.
Then add ideas every bit a resource in config/routes.rb:
Rails .application.routes.draw practise namespace :api do namespace :v1 do resources :ideas end finish cease Alright, now permit's exam our first API endpoint!
Kickoff, let's start the Rails API server on port 3001:
rails south -p 3001 Then, let's test our endpoint for getting all ideas with coil:
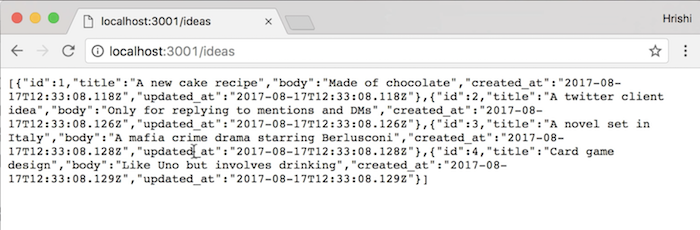
curl -G http://localhost:3001/api/v1/ideas And that prints all our ideas in JSON format:
[ { "id":18,"title" : "Card game design","body" : "Like Uno but involves drinking","created_at" : "2017-09-05T15:42:36.217Z","updated_at" : "2017-09-05T15:42:36.217Z" },{ "id":17,"championship" : "A novel fix in Italia","torso" : "A mafia criminal offence drama starring Berlusconi","created_at" : "2017-09-05T15:42:36.213Z","updated_at" : "2017-09-05T15:42:36.213Z" },{ "id":16,"title" : "A twitter customer idea","body" : "Only for replying to mentions and DMs","created_at" : "2017-09-05T15:42:36.209Z","updated_at" : "2017-09-05T15:42:36.209Z" },{ "id":xv,"championship" : "A new cake recipe","torso" : "Made of chocolate","created_at" : "2017-09-05T15:42:36.205Z","updated_at" : "2017-09-05T15:42:36.205Z" } ] We can too exam the endpoint in a browser by going to http://localhost:3001/api/v1/ideas.
Setting upwards Our Front-end App Using Create React App
Now that we have a basic API, let'southward set upward our front-end React app using Create React App. Create React App is a projection by Facebook that helps y'all go started with a React app quickly without any configuration.
First, make sure y'all have Node.js and npm installed. You can download the installer from the Node.js website. And then install Create React App by running:
npm install -g create-react-app Then, make certain you lot're outside the Rails directory and run the following command:
create-react-app ideaboard That volition generate a React app called ideaboard, which nosotros'll now utilise to talk to our Rails API.
Let's run the React app:
cd ideaboard npm showtime This will open it on http://localhost:3000.
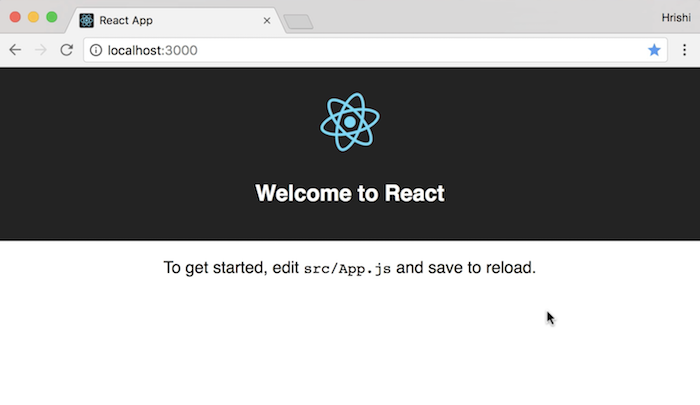
The app has a default folio with a React component called App that displays the React logo and a welcome message.
The content on the page is rendered through a React component in the src/App.js file:
import React , { Component } from 'react' import logo from './logo.svg' import './App.css' class App extends Component { render ( ) { return ( <div className = "App" > <div className = "App-header" > <img src = {logo} className = "App-logo" alt = "logo" /> <h2 > Welcome to React </h2 > </div > <p className = "App-intro" > To go started, edit <code > src/App.js </code > and save to reload. </p > </div > ) ; } } export default App Our First React Component
Our next stride is to edit this file to utilize the API we but created and list all the ideas on the page.
Let'due south kickoff off by replacing the Welcome message with an h1 tag with the championship of our app 'Thought Board'.
Let'due south also add a new component called IdeasContainer. We need to import it and add it to the render function:
import React , { Component } from 'react' import './App.css' import IdeasContainer from './components/IdeasContainer' class App extends Component { return ( ) { return ( <div className = "App" > <div className = "App-header" > <h1 > Idea Lath </h1 > </div > < IdeasContainer /> </div > ) ; } } export default App Let's create this IdeasContainer component in a new file in src/IdeasContainer.js under a src/components directory.
import React , { Component } from 'react' course IdeasContainer extends Component { return ( ) { return ( <div > Ideas </div > ) } } export default IdeasContainer Let's likewise modify the styles in App.css to have a white header and black text, and besides remove styles we don't need:
.App-header { text-align : middle; meridian : 150 px ; padding : twenty px ; } .App-intro { font-size : large; } 
This component needs to talk to our Rails API endpoint for getting all ideas and display them.
Fetching API Data with axios
We'll make an Ajax call to the API in the componentDidMount() lifecycle method of the IdeasContainer component and shop the ideas in the component state.
Let's start past initializing the state in the constructor with ideas equally an empty assortment:
constructor ( props ) { super (props) this . country = { ideas: [ ] } } And then nosotros'll update the state in componentDidMount().
Let's apply the axios library for making the API calls. Y'all can besides employ fetch or jQuery if you prefer those.
Install axios with npm:
npm install axios --save And so import it in IdeasContainer:
import axios from 'axios' And use it in componentDidMount():
componentDidMount ( ) { axios. get ( 'http://localhost:3001/api/v1/ideas.json' ) . then ( response => { console . log (response) this . setState ( {ideas: response. data } ) } ) . catch ( error => console . log (error) ) } At present if we refresh the folio … information technology won't piece of work!
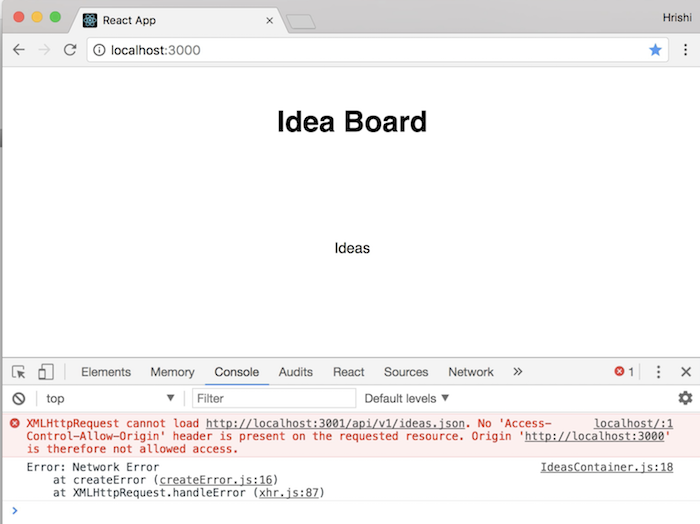
We'll go a "No Access-Control-Allow-Origin header present" error, considering our API is on a different port and we haven't enabled Cantankerous Origin Resource Sharing (CORS).
Enabling Cantankerous Origin Resource Sharing (CORS)
And then allow's first enable CORS using the rack-cors gem in our Rails app.
Add the jewel to the Gemfile:
gem 'rack-cors' , :require = > 'rack/cors' Install information technology:
bundle install And then add the middleware configuration to config/application.rb file:
config.middleware.insert_before 0 , Rack : : Cors exercise permit practise origins 'http://localhost:3000' resource '*' , :headers = > :any , :methods = > [ :get , :post , :put , :delete , :options ] end end We restrict the origins to our front-terminate app at http://localhost:3000 and allow admission to the standard Remainder API endpoint methods for all resources.
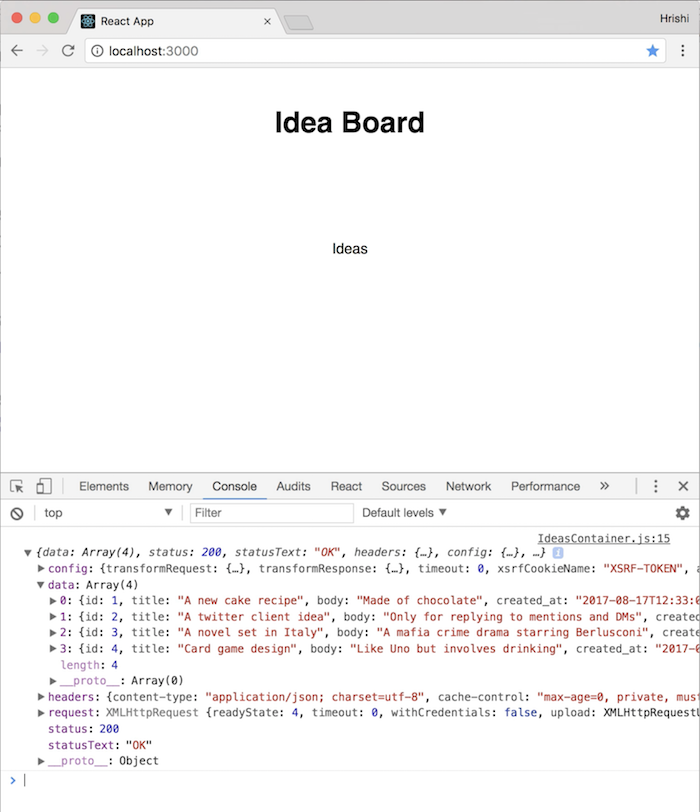
Now we demand to restart the Rails server, and if we refresh the browser, we'll no longer get the CORS error.
The folio volition load fine and we can see the response data logged in the console.
So now that nosotros know nosotros're able to fetch ideas from our API, let's apply them in our React component.
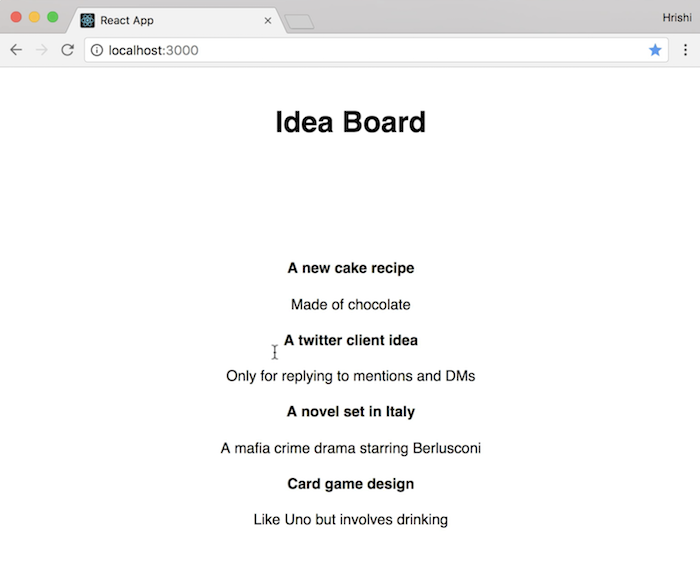
We tin can change the return function to iterate through the list ideas from the country and display each of them:
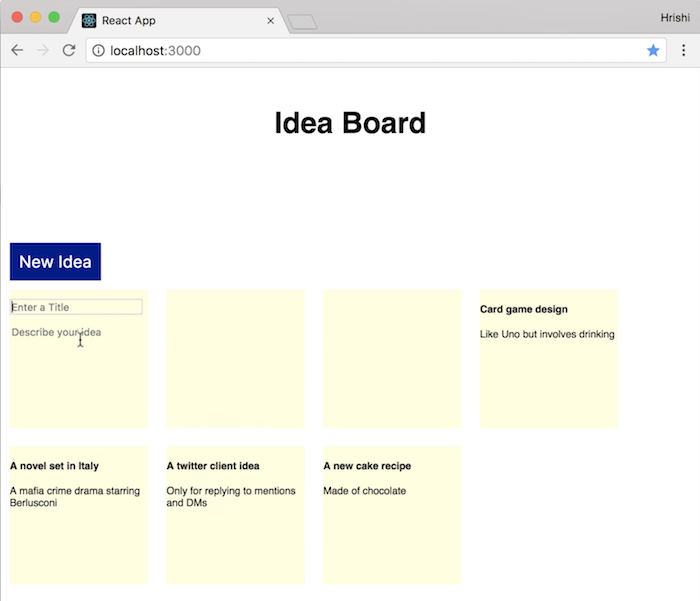
return ( ) { return ( <div > { this . state . ideas . map ( ( idea ) => { return ( <div className = "tile" key = {idea. id } > <h4 > {idea. title } </h4 > <p > {idea. body } </p > </div > ) } ) } </div > ) ; } That will display all the ideas on the page now.
Note the primal attribute on the tile div.
Nosotros need to include information technology when creating lists of elements. Keys help React place which items have inverse, are added, or are removed.
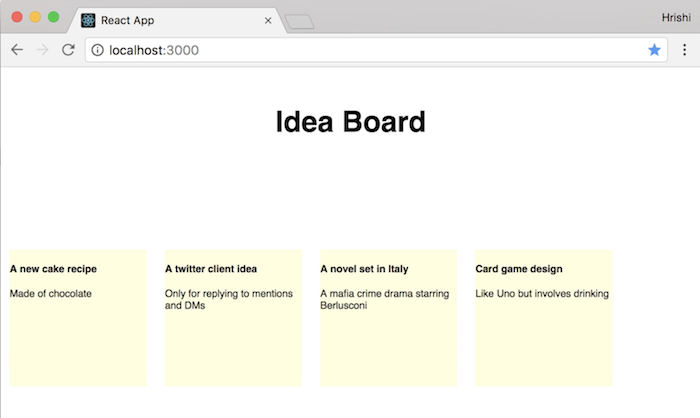
Now let's add some styling in App.css to make each idea await like a tile:
.tile { pinnacle : 150 px ; width : 150 px ; margin : x px ; background : lightyellow ; bladder : left; font-size : 11 px ; text-align : left; } We set the height, width, background colour and make the tiles bladder left.
Stateless functional components
Before we go on, let'southward refactor our code and then far and move the JSX for the idea tiles into a separate component called Thought.
import React from 'react' const Thought = ( {idea} ) => <div className = "tile" key = {idea. id } > <h4 > {idea. title } </h4 > <p > {idea. torso } </p > </div > consign default Idea This is a stateless functional component (or as some call it, a "dumb" component), which means that it doesn't handle any land. It'southward a pure function that accepts some information and returns JSX.
Then inside the map function in IdeasContainer, we tin return the new Idea component:
{ this . land . ideas . map ( ( idea ) => { return ( < Idea thought = {idea} key = {idea. id } /> ) } ) } Don't forget to import Thought as well:
import Thought from './Idea' Great, so that'southward the first office of our app complete. Nosotros have an API with an endpoint for getting ideas and a React app for displaying them as tiles on a board!
Adding a new tape
Adjacent, we'll add together a way to create new ideas.
Let's start by calculation a button to add a new thought.
Inside the render function in IdeasContainer, add:
<push className = "newIdeaButton" > New Idea </button > And permit's add together some styling for information technology in App.css:
.newIdeaButton { background : darkblue ; color : white ; border : none; font-size : 18 px ; cursor : pointer; margin-right : 10 px ; margin-left : x px ; padding : 10 px ; } 
Now when nosotros click the button, nosotros want another tile to appear with a form to edit the idea.
One time we edit the form, nosotros want to submit it to our API to create a new idea.
API endpoint for creating a new idea
So permit's start of by first making an API endpoint for creating new ideas in IdeasController:
def create @thought = Thought .create(idea_params) render json: @idea end private def idea_params params. require ( :idea ) .permit( :title , :body ) cease Since Track uses strong parameters, we define the private method idea_params to whitelist the params we need — title and body.
At present nosotros take an API endpoint to which we tin post thought data and create new ideas.
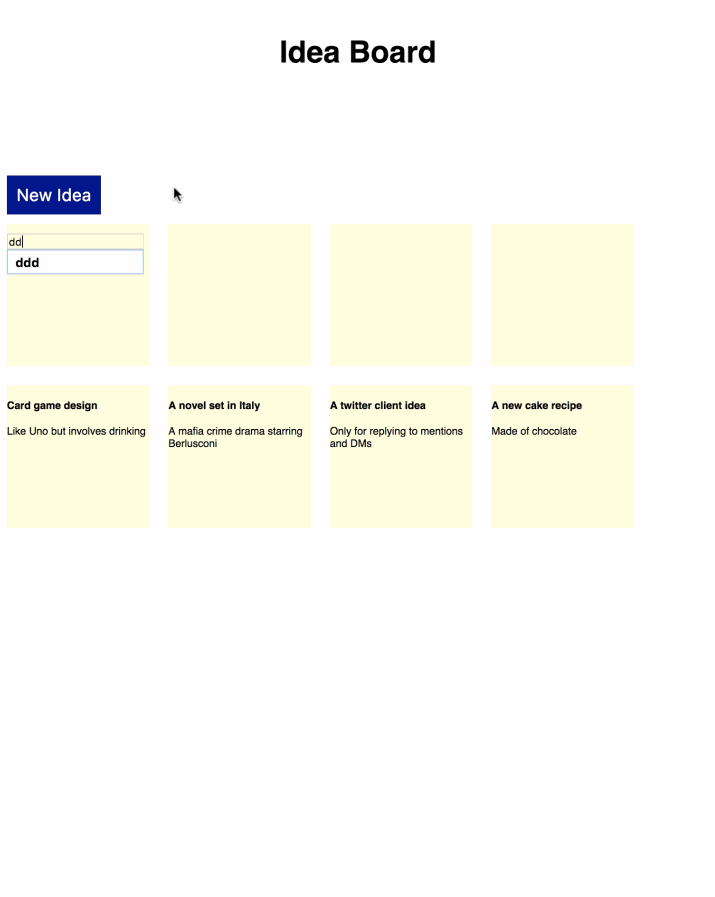
Back in our React app, now permit's add a click handler called addNewIdea to the new idea button:
<push button className = "newIdeaButton" onClick = { this . addNewIdea } > New Thought </push > Let'southward define addNewIdea as a role that uses axios to make a POST call to our new idea endpoint with a bare idea. Permit'due south just log the response to the panel for now:
addNewIdea = ( ) => { axios. post ( 'http://localhost:3001/api/v1/ideas' , { thought: { title: '' , trunk: '' } } ) . then ( response => { console . log (response) } ) . catch ( error => console . log (error) ) } Now if we try clicking on the new idea button in the browser, we'll see in the panel that the response contains a information object with our new idea with a bare championship and body.
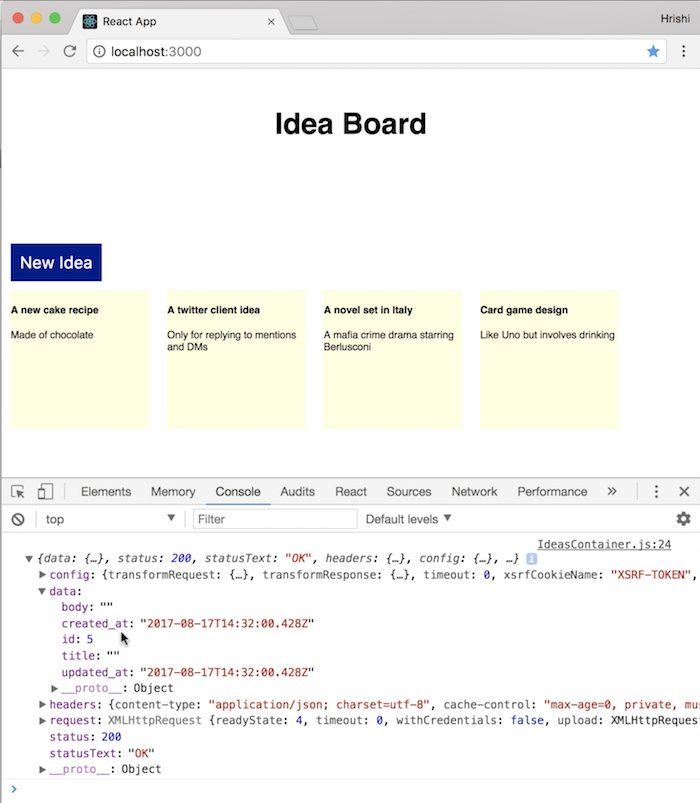
When nosotros refresh the page, we can see an empty tile representing our new thought.
What we really desire to happen is that, when we click the new idea push button, an thought is created immediately, and a grade for editing that idea appears on the page.
This way, nosotros can employ the same form and logic for editing any idea later on on in the tutorial.
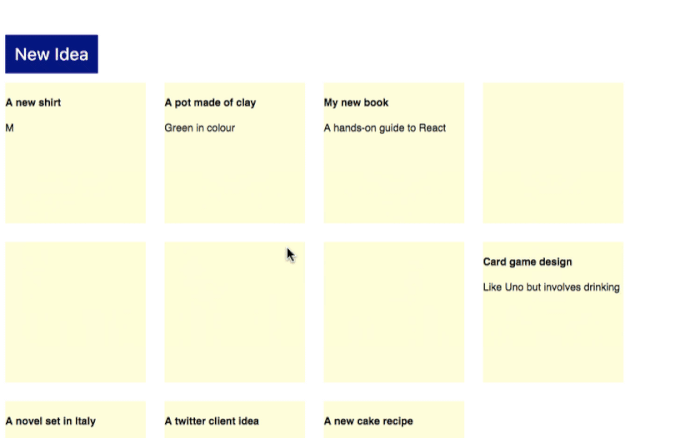
Before we do that, let'south first society the ideas on the folio in reverse chronological order so that the newest ideas appear at the height.
So let's change the definition of @ideas in IdeasController to club ideas in descending order of their created_at time:
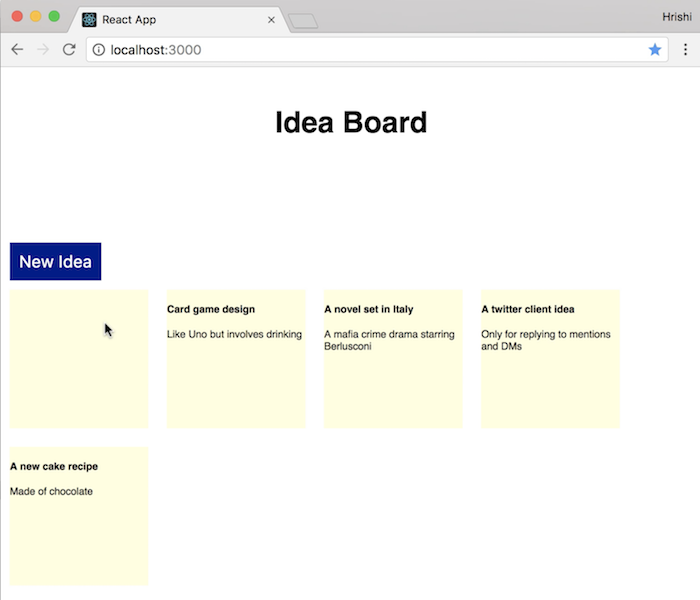
module Api : : V1 class IdeasController < ApplicationController def index @ideas = Idea .society( "created_at DESC" ) render json: @ideas end stop end Alright, now the latest ideas are displayed beginning.
Now, let's continue with defining addNewIdea.
Starting time, permit's use the response from our POST phone call to update the assortment of ideas in the country, then that when we add a new thought it appears on the page immediately.
We could just push the new idea to the array, since this is only an example app, only information technology'due south good practice to use immutable data.
So permit's utilize immutability-helper, which is a nice package for updating information without direct mutating it.
Install it with npm:
npm install immutability-helper --salve Then import the update office in IdeasContainer:
import update from 'immutability-helper' Now let'due south use information technology within addNewIdea to insert our new idea at the offset of the array of ideas:
addNewIdea = ( ) => { axios. post ( 'http://localhost:3001/api/v1/ideas' , { idea: { title: '' , torso: '' } } ) . and so ( response => { console . log (response) const ideas = update ( this . country . ideas , { $splice: [ [ 0 , 0 , response. data ] ] } ) this . setState ( {ideas: ideas} ) } ) . take hold of ( error => panel . log (error) ) } We brand a new copy of this.state.ideas and use the $splice command to insert the new thought (in response.data) at the 0th index of this array.
Then we use this new ideas assortment to update the land using setState.
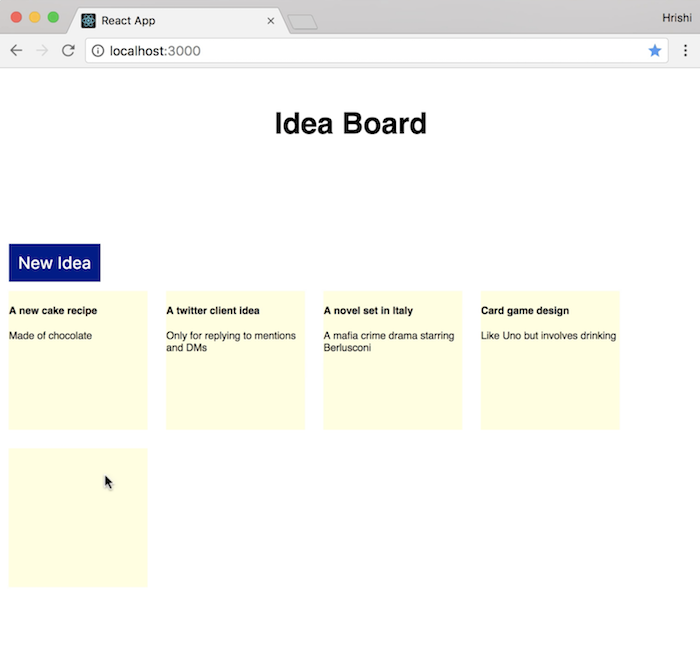
At present if we try the app in the browser and click the new thought button, a new empty tile appears immediately.
Now we tin can proceed with editing this idea.
First, we need a new state property editingIdeaId, which keeps track of which idea is being currently edited.
Past default, we're not editing whatever idea, so let's initialize editingIdeaId in the state with a nothing value:
this . state = { ideas: [ ] , editingIdeaId: zero } Now when we add together a new idea, in add-on to calculation it to state.ideas, we as well want to set its id every bit the value of state.editingIdeaId. And then permit'southward alter the setState call in addNewIdea to include also set up editingIdeaId:
this . setState ( { ideas: ideas, editingIdeaId: response. data . id } ) And so this indicates that we've simply added a new idea and we want to edit it immediately.
The complete addNewIdea part now looks similar this:
addNewIdea = ( ) => { axios. post ( 'http://localhost:3001/api/v1/ideas' , { thought: { title: '' , trunk: '' } } ) . so ( response => { const ideas = update ( this . country . ideas , { $splice: [ [ 0 , 0 , response. data ] ] } ) this . setState ( { ideas: ideas, editingIdeaId: response. data . id } ) } ) . catch ( error => panel . log (error) ) } A Form component
Now we tin can use state.editingIdeaId in the return function, and so that instead of displaying but a normal idea tile, nosotros tin display a form.
Inside the map office, let's change the return value to a conditional argument, which renders an IdeaForm component if an idea'southward id matches state.editingIdeaId, otherwise rendering an Idea component:
{ this . country . ideas . map ( ( idea ) => { if ( this . land . editingIdeaId === idea. id ) { return ( < IdeaForm thought = {idea} key = {thought. id } /> ) } else { return ( < Idea idea = {idea} key = {idea. id } /> ) } } ) } Let'southward import the IdeaForm component in IdeasContainer:
import IdeaForm from './IdeaForm' And let's define it in IdeaForm.js. Nosotros'll offset with a simple form component, which renders a class with two input fields for the idea title and torso:
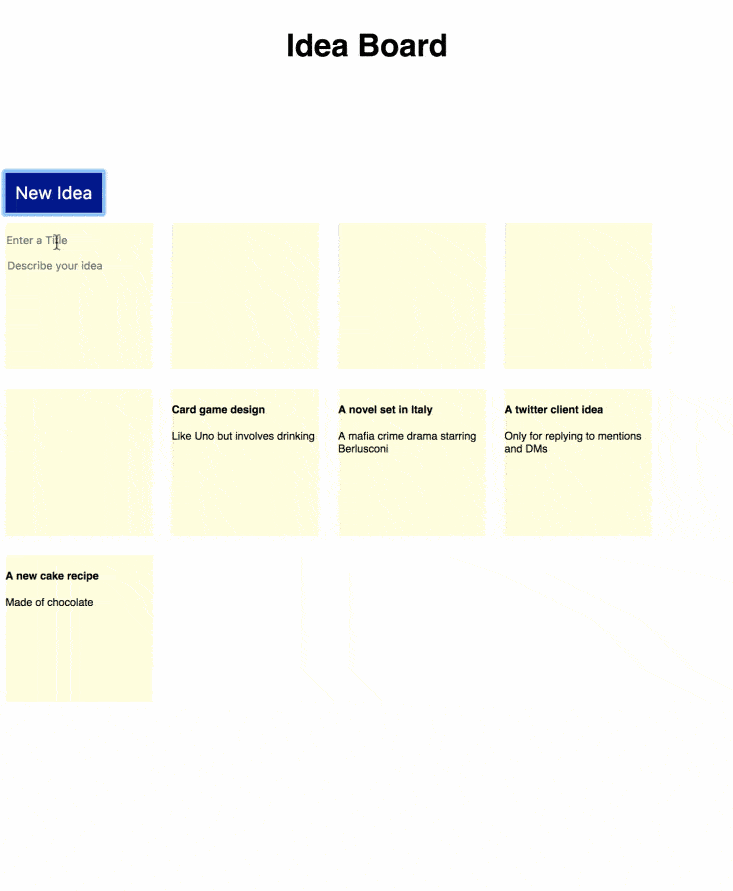
import React , { Component } from 'react' import axios from 'axios' form IdeaForm extends Component { constructor ( props ) { super (props) this . state = { } } return ( ) { render ( <div className = "tile" > <form > <input className = 'input' type = "text" name = "championship" placeholder = 'Enter a Title' /> <textarea className = 'input' name = "body" placeholder = 'Describe your thought' > </textarea > </grade > </div > ) ; } } export default IdeaForm Let'southward add a scrap of CSS in App.css to style the form:
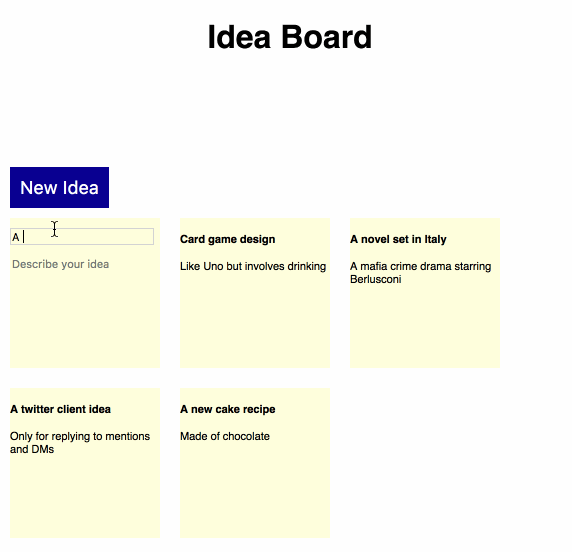
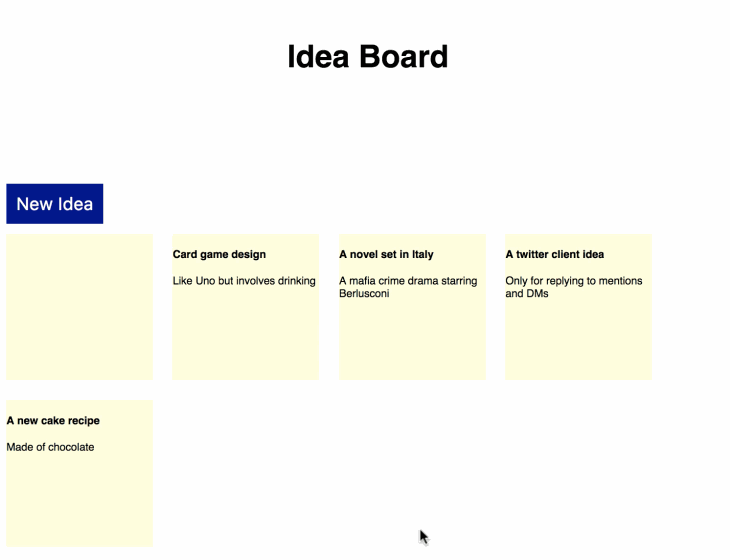
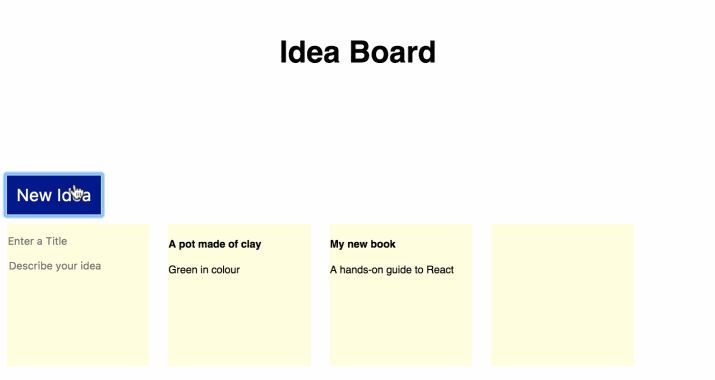
.input { border : 0 ; background : none; outline : none; margin-top : ten px ; width : 140 px ; font-size : 11 px ; } .input :focus { edge : solid 1 px lightgrey ; } textarea { resize : none; tiptop : 90 px ; font-size : 11 px ; } Now when nosotros click on the new idea button, a new tile appears with a form in it:
Now let'southward make this form functional!
Nosotros demand to hook upwardly the form input fields to the state.
First, permit'south initialize the IdeaForm component land values from the idea prop that it receives from IdeasContainer:
form IdeaForm extends Component { constructor ( props ) { super (props) this . country = { title: this . props . idea . championship , body: this . props . idea . body } } And then prepare the class field values to their respective state values and set up an onChange handler:
<form > <input className = 'input' type = "text" name = "title" placeholder = 'Enter a Championship' value = { this . state . championship } onChange = { this . handleInput } /> <textarea className = 'input' name = "torso" placeholder = 'Describe your thought' value = { this . state . torso } onChange = { this . handleInput } > </textarea > </form > Nosotros'll define handleInput such that, when we type in either of the input fields, the respective state value and so the value of the field gets updated:
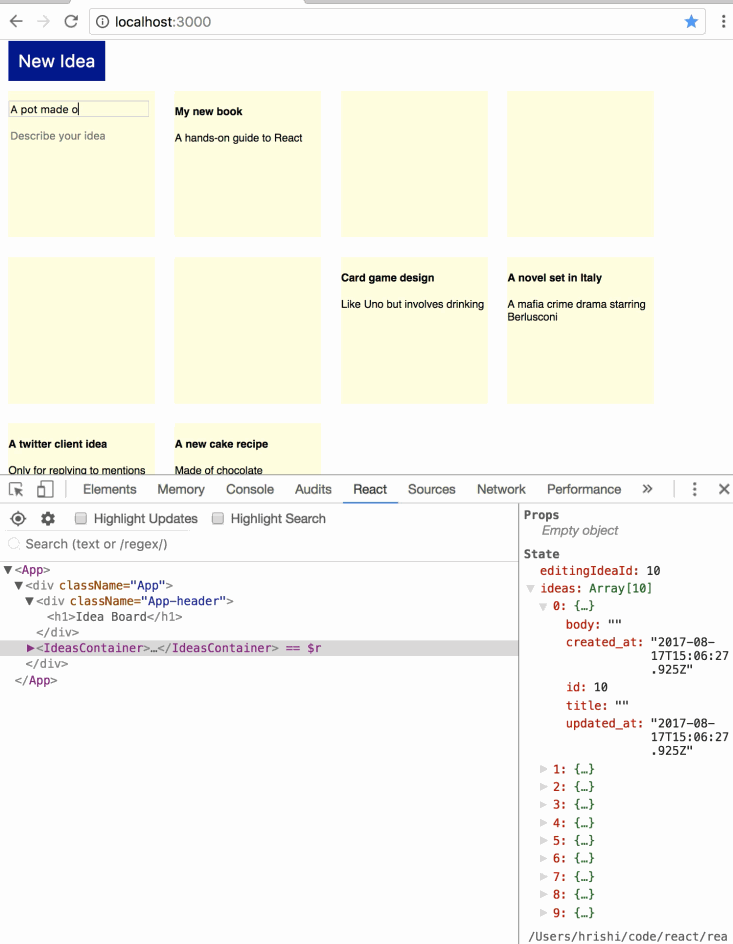
handleInput = ( due east ) => { this . setState ( { [east. target . proper noun ] : e. target . value } ) } Tracking state changes in React Programmer Tools
Let'south see these state changes in activeness with the React Programmer Tools browser extension. You tin can become it for Chrome here and for Firefox here.
Once yous accept it installed, refresh the app page and open up the programmer console. You should see a new React tab.
When you click on information technology, you lot'll see our app components tree on the left and all the props and state associated with each component on the right.
Now nosotros're updating the class fields, but we're still not saving the edited thought. So the next affair needed is that, when nosotros blur out of a form field, we want to submit the form and update the idea.
API endpoint for updating ideas
First, nosotros need to define an API endpoint for updating ideas. And so let'due south add an update activeness in IdeasController:
def update @idea = Idea .find(params[ :id ] ) @idea .update_attributes(idea_params) return json: @idea finish Back in IdeaForm.js, we'll ready an onBlur handler chosen handleBlur to the form:
<form onBlur = { this . handleBlur } > Nosotros'll define handleBlur to make a PUT phone call to our API endpoint for updating ideas with idea data from the state. For now, let's just log the response to the console and come across if our call works:
handleBlur = ( ) => { const idea = { title: this . state . title , body: this . state . torso } axios. put ( ` http://localhost:3001/api/v1/ideas/ ${ this . props . idea . id } ` , { thought: idea } ) . then ( response => { panel . log (response) } ) . catch ( error => console . log (error) ) } We as well need to import axios in this file to be able to use it:
import axios from 'axios' Now if nosotros click on the new idea button, edit its title and blur out of that field, we'll come across our API response logged in the console, with the new edited thought data.
The same thing happens if we edit the torso and blur out of that field.
So our onBlur handler works and we can edit our new idea, but nosotros likewise need to send the edited idea data back up to IdeasContainer so that it can update its own state likewise.
Otherwise, state.ideas won't accept the updated value of the idea we only edited.
We'll use a method chosen updateIdea, which nosotros'll laissez passer as a prop from IdeasContainer to IdeaForm. We'll call updateIdea with the response data from our API telephone call:
handleBlur = ( ) => { const idea = { title: this . country . title , body: this . country . body } axios. put ( ` http://localhost:3001/api/v1/ideas/ ${ this . props . idea . id } ` , { idea: idea } ) . then ( response => { console . log (response) this . props . updateIdea (response. data ) } ) . catch ( fault => console . log (fault) ) } Now in IdeasContainer, permit's transport an updateIdea office as a prop to IdeaForm:
< IdeaForm idea = {idea} cardinal = {idea. id } updateIdea = { this . updateIdea } /> Let's define the office to do an immutable update of the idea in state.ideas:
updateIdea = ( idea ) => { const ideaIndex = this . state . ideas . findIndex ( x => 10. id === idea. id ) const ideas = update ( this . state . ideas , { [ideaIndex] : { $set: idea } } ) this . setState ( {ideas: ideas} ) } First, we find the alphabetize of the edited idea in the array, and and so use the $prepare command to supercede the onetime value with the new i. Finally, we call setState to update state.ideas.
We can see this in activity in the browser with the React Developer Tools tab open.
Displaying a success notification
Now we tin can add a new idea and edit information technology, only the user gets no visual feedback or confirmation when the idea is saved. So let'south add together a notification message to tell the user when an idea has been successfully saved.
Let's add together a span next to the new idea push button to display a notification from a value in state:
<span className = "notification" > { this . state . notification } </span > Let's initialize land.notification as an empty string:
constructor ( props ) { super (props) this . state = { ideas: [ ] , editingIdeaId: nil , notification: '' } } At present every fourth dimension an idea gets updated, we'll update land.notification with a success notification we desire to show to the user.
So in the setState phone call in updateIdea, in improver to updating ideas, allow's also update notification:
this . setState ( { ideas: ideas, notification: 'All changes saved' } ) Now when nosotros edit an idea and mistiness out of the input field, the thought gets saved and nosotros see the success notification.
We also want to reset the notification as soon every bit the user makes a modify that hasn't been saved even so.
So in the handleInput role of the IdeaForm component, let's call a function chosen resetNotification to reset the notification bulletin:
handleInput = ( e ) => { this . props . resetNotification ( ) this . setState ( { [e. target . name ] : eastward. target . value } ) } At present, inside the render function of IdeasContainer, let's as well pass resetNotification as a prop to IdeaForm:
< IdeaForm thought = {idea} primal = {thought. id } updateIdea = { this . updateIdea } resetNotification = { this . resetNotification } /> Let's define resetNotification as:
resetNotification = ( ) => { this . setState ( {notification: '' } ) } Now after a success notification appears, if nosotros edit the idea once again, the notification disappears.
Editing an existing thought
Next, let's add the ability to edit an existing idea. When we click on an idea tile, we want to change the tile and then that it replaces the Idea component with an IdeaForm component to edit that thought.
Then we can edit the idea and it will get saved on blur.
In gild to add this characteristic, nosotros need to add a click handler on our idea tiles.
So first we need to convert our Thought component from a functional component into a class component so we tin gear up define a click handler function handleClick for the title and body.
import React , { Component } from 'react' class Thought extends Component { handleClick = ( ) => { this . props . onClick ( this . props . idea . id ) } render ( ) { return ( <div className = "tile" > <h4 onClick = { this . handleClick } > { this . props . idea . title } </h4 > <p onClick = { this . handleClick } > { this . props . thought . body } </p > </div > ) } } export default Idea Note that we accept to add this.props. to use the props value, considering different in the functional component, we are no longer destructuring the props object.
handleClick calls this.props.onClick with the idea id.
Now, inside the render office of IdeasContainer, let's also laissez passer onClick as a prop to Idea:
return ( < Idea idea = {idea} fundamental = {idea. id } onClick = { this . enableEditing } /> ) We'll define enableEditing to set the value of country.editingIdeaId to the clicked idea's id:
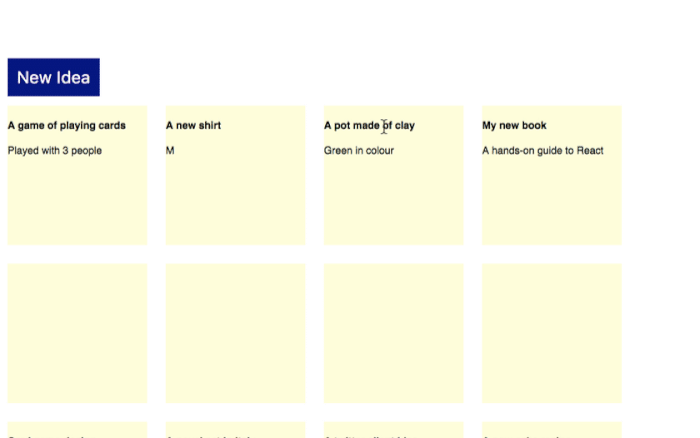
enableEditing = ( id ) => { this . setState ( {editingIdeaId: id} ) } Now when nosotros click on a tile, it instantly becomes editable!
When nosotros click on a tile, once the form appears, allow's also gear up the cursor focus to the championship input field.
Nosotros can do that by adding a ref on the title input field in IdeaForm:
<input className = 'input' type = "text" name = "title" placeholder = 'Enter a Title' value = { this . state . championship } onChange = { this . handleInput } ref = { this . props . titleRef } /> We demand to pass the ref as a prop, because we desire to use it in the parent component IdeasContainer, where we tin can define the ref every bit a callback function:
< IdeaForm thought= {thought} key= {thought. id } updateIdea= { this . updateIdea } titleRef= { input => this . title = input} resetNotification= { this . resetNotification } / > Now we can use this ref in enableEditing to set up the focus in the title input field:
enableEditing = ( id ) => { this . setState ( {editingIdeaId: id} , ( ) => { this . championship . focus ( ) } ) } Discover that we didn't telephone call this.title.focus() as a separate function later on calling setState. Instead, we passed it to setState inside a callback as a 2d argument.
We did this because setState doesn't always immediately update the component. Past passing our focus call in a callback, we make sure that it gets called only after the component has been updated.
Now if nosotros endeavor the app in a browser, when nosotros click on an idea tile, it becomes editable with a form and the cursor gets focused within its title input field.
And then now we can add together and edit ideas.
Deleting an idea
Finally, nosotros desire to exist able to delete ideas.
When we hover over an thought tile, we want a delete button (in the grade of a red cross) to appear in the acme right corner. Clicking that cross should delete the idea and remove the tile from the board.
So let's start by calculation some markup and CSS to brandish the delete button on hover.
In the Thought component, add a span with a course deleteButton and the text 'x':
<div className = "tile" > <span className = "deleteButton" > x </span > Then let'south add together some CSS in App.css to hide this span past default and brand it visible when nosotros hover over a tile:
.deleteButton { visibility : hidden; float : right; margin : 5 px ; font-size : 14 px ; cursor : arrow; colour : crimson ; } .tile :hover .deleteButton { visibility : visible; } 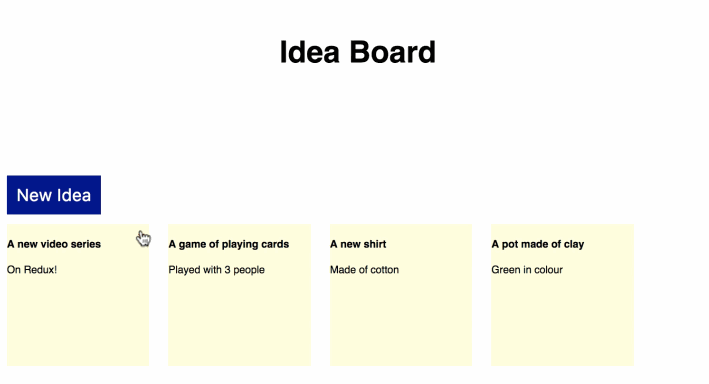
Next, allow's add a click handler handleDelete to this delete button, which then deletes the idea:
<span className = "deleteButton" onClick = { this . handleDelete } > x </bridge > Like to handleClick, we'll define handleDelete equally an arrow function that calls another function this.props.onDelete with the tile's idea id:
handleDelete = ( ) => { this . props . onDelete ( this . props . idea . id ) } Let's laissez passer onDelete as a prop from IdeasContainer:
< Idea idea = {idea} primal = {thought. id } onClick = { this . enableEditing } onDelete = { this . deleteIdea } /> Nosotros'll define deleteIdea in a moment, but first let'due south add together an API endpoint for deleting ideas in IdeasController:
def destroy @idea = Thought .find(params[ :id ] ) if @idea .destroy head :no_content , status: :ok else render json: @thought .errors, status: :unprocessable_entity cease end Now let'due south ascertain deleteIdea in IdeasContainer equally a function that makes a DELETE call to our API with the idea id and, on success, updates state.ideas:
deleteIdea = ( id ) => { axios. delete ( ` http://localhost:3001/api/v1/ideas/ ${id} ` ) . so ( response => { const ideaIndex = this . state . ideas . findIndex ( 10 => x. id === id) const ideas = update ( this . state . ideas , { $splice: [ [ideaIndex, i ] ] } ) this . setState ( {ideas: ideas} ) } ) . catch ( fault => console . log (error) ) } Once again, we look up the alphabetize of the deleted idea, use update with the $splice command to create a new array of ideas, and so update state.ideas with that.
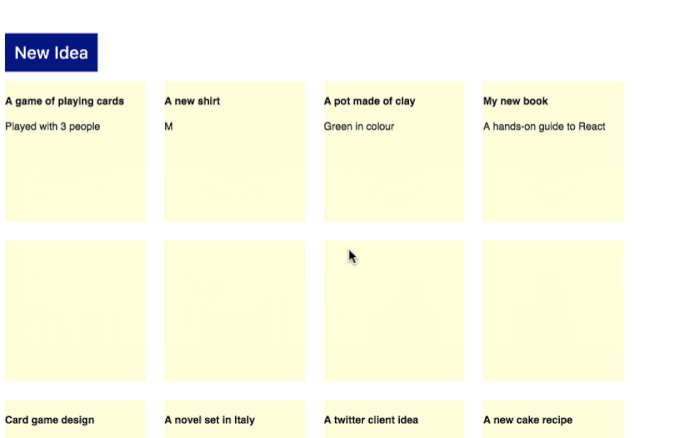
Now nosotros can endeavor information technology in the browser. When we hover over an idea tile, the ruby delete button appears. Clicking on it deletes the idea and removes the tile from the board.
Hurray, we now have a functional app with all the basic CRUD functionality!
Wrap Up
In this tutorial, nosotros built a consummate CRUD app using a Runway 5.1 API and a forepart-end React app.
Our API has 3 endpoints, ane each for creating, updating and deleting ideas.
We used Create React App to make our React app. This made setup completely painless and easy. Nosotros could dive directly into building our app instead of configuring anything.
Nosotros used axios for making Ajax calls to the API and immutability-helper to brand information updates.
In a hereafter tutorial, we can look at how to deploy this app to a product server and too add together some animations and transitions to spice upwards the UI. For case, nosotros could fade in new idea tiles and fade out deleted tiles, fade in and out notification letters.
Y'all can scout a video version of this tutorial here.
You tin encounter the full code for the app on GitHub:
Ideaboard Rail API
Ideaboard React frontend
vondoussadrinnera.blogspot.com
Source: https://www.sitepoint.com/react-rails-5-1/
0 Response to "How to Read a Api With Ruby on Rails"
Post a Comment